Case Study (Archive, Single Page)
Loyde offers possibility to customize layout of case studies-related pages. This includes:
- Case studies archive (case studies listings page)
- Single case study post
It's also possible to completely disable the Case Studies custom post type.
Disable Case Studies
When case studies are disabled:
- They won't appear in WordPress admin menu
- Any case studies-related page builder elements (if left on some page) won't render any posts.
Steps:
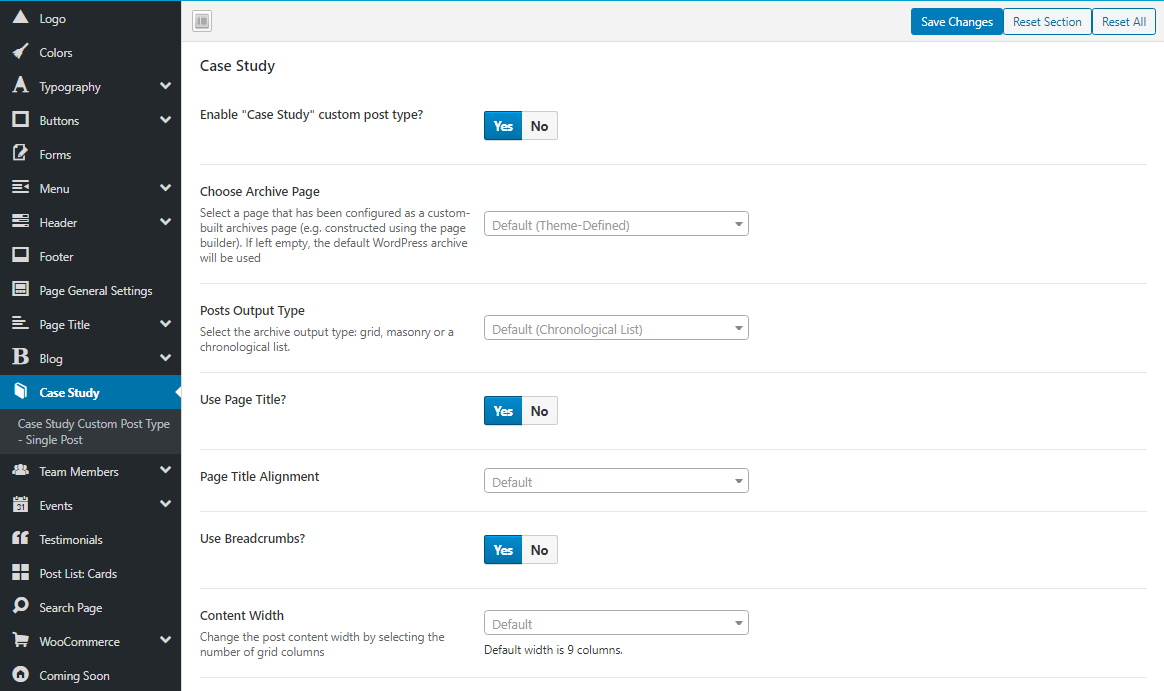
- Go to WP admin -> Loyde -> Theme Options -> Case Study
- Under Enable "Case Study" custom post type? choose "No".
Of course, case studies can be re-enabled following the same steps.
Case Studies Archive

It is possible to:
- Choose how the posts are rendered (grid, masonry or a chronological list)
- Enable/disable page title
- Configure page title alignment
- Enable/disable breadcrumbs
- Control sidebar appearance (left, right, and no sidebar)
- Define the ratio between the content and the sidebars (if sidebar is shown)
- Choose widget area displayed on case studies listings page
- Choose number of columns (if posts are rendered as "grid" or "masonry")
- Enforce a completely custom content of the case studies listings page, built using page builder
How to choose the posts output (grid, masonry or a chronological list)
It's possible to display posts as:
- Grid
- Masonry
- Chronological list
In grid and masonry views, posts are rendered in multiple columns. In chronological list, posts are rendered one below the other.
How to change output type:
- Go to WP admin -> Loyde -> Theme Options -> Case Study
- Under Post List Layout choose the desired output.
By default, posts are rendered as a chronological list.
How to change number of columns for grid or masonry output
Steps:
- Go to WP admin -> Loyde -> Theme Options -> Case Study
- Under Number of Displayed Columns choose the number, between 2 and 4.
Default number of columns is 3.
How to show/hide page title
Steps:
- Go to WP admin -> Loyde -> Theme Options -> Case Study
- Under Use Page Title? choose Yes or No.
How to show/hide breadcrumbs
Steps:
- Go to WP admin -> Loyde -> Theme Options -> Case Study
- Under Use Page Title? choose Yes or No.
How to move the sidebar to the left- or to the right of content
Steps:
- Go to WP admin -> Loyde -> Theme Options -> Case Study
- Under Sidebars Position choose the "Sidebar Left" or "Sidebar Right" image.
How to hide sidebar
Steps:
- Go to WP admin -> Loyde -> Theme Options -> Case Study
- Under Sidebars Position choose the "No Sidebar" image.
How to choose a different widget area for the case studies listings page
Steps:
- Go to WP admin -> Loyde -> Theme Options -> Case Study
- Under Choose Widget Area choose any widget area from the list.
How to choose a completely custom layout for the case studies listings, built using page builder
By default, WordPress renders case studies archive posts using the default posts loop (theme-defined .php template). However, in Loyde it's possible to change this, and compose the case studies listings page using the page builder.
Steps:
- Go to WP admin -> Pages
- Create the new page, or open an existing page for editing
- Create the page content using the WPBakery Page Builder. As a reminder, listing case studies posts can be done through the custom WPBakery element Case Studies Post List, added by Loyde
- After the page is finished and saved, go to WP admin -> Loyde -> Theme Options -> Case Study
- Under Choose Archive Page, choose the newly created page.
Some additional info here.
Note: If this option is used, other case studies archive-related settings from this Theme Options page won't be applied anymore. Reason: Because entire page content can be built and completely customized using the page builder.
Single Case Studies Post

It's possible to:
- Customize typography (font-related settings)
- Show/hide "Share This" buttons
- Show/hide page title
- Show/hide breadcrumbs
- Customize where the featured image is displayed (background of the page title, or separatelly, above the content)
- Show/hide sidebar and determine its position
- Choose widget area
- Show/hide section with the previous/next links
- Show/hide related posts
- Customize related posts: sorting and number
- Choose a predefined layout for the single post
Show/hide "Share This" buttons
Shows or hides the "Share This" button group. This is a group of buttons which appears on single posts, and is used to share the post on popular social networks. Steps:
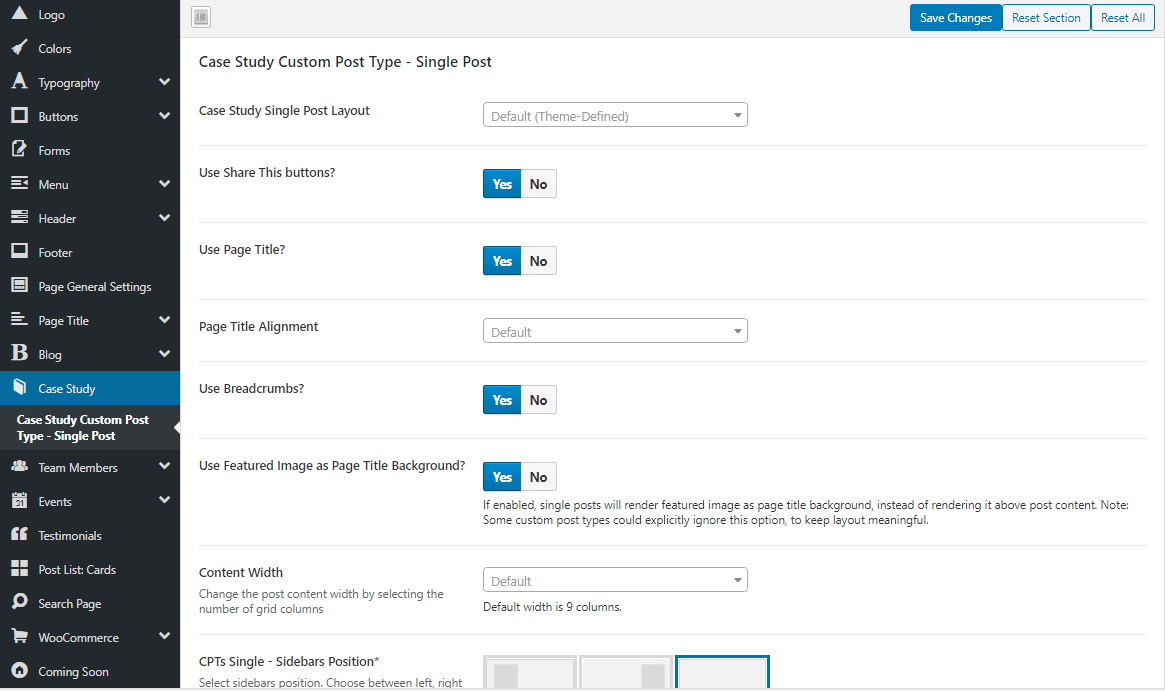
- Go to WP admin -> Loyde -> Theme Options -> Case Study -> Case Study Custom Post Type - Single Post
- Under Use Social Sharing buttons?, choose No
Show/hide page title?
Steps:
- Go to WP admin -> Loyde -> Theme Options -> Case Study -> Case Study Custom Post Type - Single Post
- Under Use Page Title?, choose No
This shows or hides the page title on all single case studies posts.
Change page title alignment
Steps:
- Go to WP admin -> Loyde -> Theme Options -> Case Study -> Case Study Custom Post Type - Single Post
- Under Page Title Alignment, choose Left, Center or Right
This defines page title alignment on all single case studies posts.
Show/hide breadcrumbs
Steps:
- Go to WP admin -> Loyde -> Theme Options -> Case Study -> Case Study Custom Post Type - Single Post
- Under Use Breadcrumbs?, choose No
This shows or hides breadcrumbs on all single case studies posts.
Customize where the featured image is displayed
By default, single post featured image is displayed as page title background. But it can be changed, to show the featured image in the standard place, above the post content.
Steps:
- Go to WP admin -> Loyde -> Theme Options -> Case Study -> Case Study Custom Post Type - Single Post
- Under Use Featured Image as Page Title Background?, choose No
Content Width
Change the post content width by selecting the number of grid columns. Default width is 9 columns.
Steps:
- Go to WP admin -> Loyde -> Theme Options -> Case Study -> Case Study Custom Post Type - Single Post
- Under Content Width, select a value from the dropdown
How content width behaves, depending on the sidebar
Content- and sidebar width are determined according to a 12-column grid. This imaginary 12-column grid is projected to the content area. However, these widths are dependent on one another: their sum must always be 12 (i.e. 12 columns).
If nothing is selected under Content Width setting field (if it's set to default):
- If sidebar is displayed, and nothing is selected under settings Sidebar Width and Content Width (if they're set to default), the content will be 9 columns wide.
- If sidebar is displayed, and a number is selected under Sidebar Width (e.g. "4 Columns"), it's necessary to select appropriate value under Content Width (e.g. "8 Columns"), so the sum is 12.
- If sidebar is not displayed, and nothing is selected under setting Content Width (if it's set to default), the content will be 12 columns wide (i.e. full width of the content area).
- If sidebar is not displayed, and a number is selected under setting Content Width (e.g. "11 Columns"), the content will be 11 columns wide.
Sidebar Width
Change the sidebar width, by selecting the number of grid columns. This setting has effect only if the sidebar is visible. Default width is 3 columns.
Steps:
- Go to WP admin -> Loyde -> Theme Options -> Case Study -> Case Study Custom Post Type - Single Post
- Under Content Width, select a value from the dropdown
How to move the sidebar to the left- or to the right of content
Steps:
- Go to WP admin -> Loyde -> Theme Options -> Case Study -> Case Study Custom Post Type - Single Post
- Under CPTs Single - Sidebars Position choose the "Sidebar Left" or "Sidebar Right" image.
How to hide sidebar
Steps:
- Go to WP admin -> Loyde -> Theme Options -> Case Study -> Case Study Custom Post Type - Single Post
- Under CPTs Single - Sidebars Position choose the "No Sidebar" image.
How to choose a different widget area for the single case studies post
Select widget area for the sidebar on a single case studies post (unless the sidebar has been disabled). Steps:
- Go to WP admin -> Loyde -> Theme Options -> Case Study -> Case Study Custom Post Type - Single Post
- Under Choose Widget Area choose any widget area from the list.
Customize related posts
Show/hide related posts
Steps:
- Go to WP admin -> Loyde -> Theme Options -> Case Study -> Case Study Custom Post Type - Single Post
- Under Show Related Posts? choose "No".
Customize sorting
Steps:
- Go to WP admin -> Loyde -> Theme Options -> Case Study -> Case Study Custom Post Type - Single Post
- Under Sort By choose the desired sorting.
Possible options are:
- Random order
- Date (latest first)
Select how many related posts to display
Steps:
- Go to WP admin -> Loyde -> Theme Options -> Case Study -> Case Study Custom Post Type - Single Post
- Under Number of Displayed Related Posts enter the desired value.
How to Choose a predefined post layout, built using page builder
By default, single case studies posts have default layout, using the theme-defined PHP templates. However, Loyde allows to build a completely custom layout, using the page builder.
Steps:
- Go to WP admin -> Loyde -> Theme Options -> Case Study -> Case Study Custom Post Type - Single Post
- Under Single Post Layout choose an offered layout block from the list.
More information at another documentation chapter, Advanced Scenarios.
Note: If this option is used, other case studies archive-related settings from this Theme Options page won't be applied anymore. Reason: Because entire page content can be built and completely customized using the page builder.
Case Study Custom Post Type - Archive
Enable "Case Study" custom post type?
Choose Archive Page
Select a page that has been configured as a custom-built archives page (e.g. constructed using the page builder). If left empty, the default WordPress archive will be used
Post List Layout
Select the archive output type: grid, masonry or a chronological list.
Use Page Title?
Page Title Alignment
Use Breadcrumbs?
Content Width
Change the post content width by selecting the number of grid columns. Default width is 9 columns.
Sidebar Width
Change the sidebar width, by selecting the number of grid columns. This setting has effect only if the sidebar is visible. Default width is 3 columns.
Sidebars Position
Select sidebars position. Choose between left, right or no sidebars layout. Options: Sidebar Left, Sidebar Right, No Sidebar
Content Width Layout
Select page width, and visibility of the remaining body area. Optins: Full Width, Full Width with Container.
Header - Layout of Inner Content
Select width of the content inside header. Applied only if the page has selected "Full Width with Container". Options: Boxed, Full Width.
Footer - Layout of Inner Content
Select width of the content inside footer. Applied only if the page has selected "Full Width with Container". Options: Boxed, Full Width.
Choose Widget Area
Select widget area for the sidebar on the CPTs archive page (used only if the page has a sidebar).
Number of Displayed Columns
Select how many cards to display in a grid row. Applies to "grid" and "masonry" outputs.